Tuesday 1 March 2016

What Gear am I In?!?

IMAGE 1
While doing a test run in our beloved 928 we notice a strange anomaly while shift gears.  If you are wondering what shifting gears is, well, it is something real men and the most desirable women in the world do.  So now that this is cleared up...  Like I said a strange anomaly.  The shifter decided it no longer wanted to adhere to the ridged constructs of society and decided to stick it to the man.  This man!  So the shifter was basically free go anywhere and yet refused to be a productive member of society, I mean, the transmission.  After a little investigation it became apparent that the issue was with the angular joint on top of the torque tube forward of the shifter assembly.  Image 1 shows the cup portion of the offending joint.  Once we got the car on the ramps and took a look it was very clear what the problem was.  The angular joint is made up of three component. A ball, an metallic cup and a bushing that inserts into the cup.  After thirty years the bushing has broken down and instead of looking like Image 2 it looks like Image 3.  
IMAGE 3

IMAGE 2
IMAGE 5
You can see in Image 3 that the bushing has basically broken into two pieces and is half missing.  The half that is missing is the half that locked the cup on the ball.   So there is two paths to to do a OEM repair here.  The first is to purchase a new angular joint assembly (Part# 928-424-005-01) for about $100 or if the cup is still in good shape just replace the bushing (Part#  928-116-145-03) for about $20.  The easier method is to simply spend the extra money and replace the assembly. (See Image 4)  
IMAGE 4
The problem is that it is damn near impossible to push that bushing into the cup without removing the cup from the tube guide (See part 3 in Image 1) and since you need to remove it you may as well immediately replace it with the new assembly.  To give you an idea of just how futile it is  have a good look at Image 5.  There you can clearly see how little space you have to work with while the cup is still attached.  You actually cannot even get a straight shot at pushing the bushing in. Every time you attempt to push it into the cup it will skew on you forcing you to realign and start again.  So after taking the cup off you still need to then manipulate the bushing into the cup while your blood pressure sky rockets and you begin uttering a line of expletives that will get your kid through college on the swear jar proceeds alone.  This in itself makes the complete replacement more cost effective.  So save yourself the headache and financial duress and replace the entire assembly.  


IMAGE 6
There is an alternative that makes future replacements unnecessary.  A replace once and be done with it version.  It is an alternative part offered by 928 Motorsports called a Precision Shifter Ball Cup which can be seen in Image 6.  This option will run you approximately $100 as well with shipping factored in but this option is designed for the endurance and reliability required by motor sports so for the typical driver this will be the last time you need to look at this issue.  This is definitely more complicated than the complete OEM assembly replacement given the tight space you will be working in but long term it is a solid option.  In fact this was the option we chose to move forward with.  Given the nature of the things we will be doing with the car we wanted to make sure reliability was maximized. Once we completed the install and before putting back in place all the heat shields, support members and reconnecting the oxygen sensor we checked to make sure that the shifter was doing it's job properly and voila! The shifter was now a productive member of society...I mean the transmission once again.

Monday 1 February 2016

Self Driving Cars

We have been creeping towards autonomous vehicles for years and now we appear to be on the verge of actually having them in consumer's hands. The momentum is now building at an alarming rate. The starting gun was really fired when the U.S. state of Nevada legally authorised the operation of Autonomous vehicles on state road back in 2011. Since then California, Florida, Michigan, North Dakota, Tennessee and Washington D.C. have also followed suit with legislation.  This year, 2016, in Canada the province of Ontario has begun to allow testing of autonomous on Ontario roads.  This is the standard US to Canadian exchange rate for tech adoption. Even the Institute of Electrical and Electronic Engineers (IEEE) have weighed in stating that by 2040 up to 75 per cent of all vehicles could have autonomous capabilities to some extent. There are some variations but most require a driver in the car currently and this, my friends, is what really cheeses me off! You see the driver as "the driver" must adhere to the intoxication laws and thus you still need a designated driver if you are on a bender with the lads.  All my hopes for driving to the pub having a few pints and letting the car drive me safely home are smashed!  So why bother you are asking as am I.  Well actually there is a continuum put forward by the National Highway Traffic Safety Administration (NHTSA), in the U.S.A that has 5 distinct levels.  They are as follows:
  • Level 0: Human driver is in complete control of all functions.
  • Level 1: A single function is automated.
  • Level 2: Multiple functions are automated concurrently but driver must remain attentive.
  • Level 3: Driving functions are automated such that driver can safely engage in other activities.
  • Level 4: The car can drive itself without a human driver. 
Currently we are at level 2 legally speaking
although the technology is already well into level 3 and even level 4.  So there is hope!  why is it the lawyers slow everything down? So the day will come that our cars will be able to get us safely home form the pub all by themselves! So when pub trip utopia comes how will these predecessors of SkyNet get us safely home? That is, of course, if they believe we are worthy.
To do this let's have a look at the original Google autonomous car in a little more detail. The picture to the left shows the various sensors and of course what car is complete without an Awesome Spoiler. The GPS give the car a general understanding of where it is. GPS is only accurate to a about 3m and can drop out if blocked by buildings or bridges or tunnels.  Also it is a well know statistic that 500 people per year are killed by GPS and that 90% of statistics are made up. That is why the first and foremost element of the system is the laser range finder mounted on the car's roof. (Velodyne LiDAR HDL-64E) This sub-system creates a detailed 3D model of the environment around the car. This is accurate to less than 2cm (See Picture 1) This model is then layered over high-resolution maps for the area the car is currently in. (See Picture 2) In Picture 2 you can easily see light blue laser data overlaying the high resolution map.  This gives the car textured view of the world around it.  There are actually 4 models created by this process. (See Picture 3) Moving left to right there is one that helps the car understand where it could drive, one that provides an elevation or obstacle model, one that identifies the objects expected to be fixed and use that to identify objects that could move such as traffic, pedestrians, bicycles etc., and finally a model that tells the car where it should or is suppose to drive. This helps the car react to changing conditions and how to make safe evasive manoeuvres when some dolt walks out in front of it while texting. In addition, there is a forward facing camera mounted by the rear view mirror that does recognition on traffic controls, like traffic lights, to ensure the car obeys them appropriately.  The wheel encoder and inertial motion sensors (not shown) help the car very accurately locate and track its position on the detailed maps.
Picture 1
Picture 3
Picture 2
This is all good for the environment immediately around the car as it passes at low speed but how does it deal with high speed objects hurtling at it such as the condition on the highways.  Since  the laser array has an effective radius of 200 ft that gives the car 2.1 seconds to react to an in coming object travelling at 65mph if the car is standing still.  If both objects are moving at 65mph it would be half that time. Even though the computer can easily calculate how to react it does not have the time to actually react in the real world. Obviously more time is required to react.  Radar is added to give the car the ability to sense object in the distance beyond the reach of the laser. There are three Radar sensors covering the front and front/sides on the front bumper and another on the rear bumper to cover the rear.  This give the car the ability to sense and perceive the world around it and is the first step to giving the machines the a picture of just how daft humans are.

So the car now can perceive the environment, can make the calculations and required adjustments to navigate through any road or street according to the rules of the road.  Problem...most human drivers do not follow those rules explicitly. We go when it is not our turn, we yield when we shouldn't, drive too fast or worse yet too slow in the fast lane with the blinker on! So the car needs to be ready to adjust based on interacting with other vehicles. So in the case when the car and another car arrive at an intersection at the same time the autonomous car will based on the rule of the road yield accordingly and then start to signal intent by advancing slightly.  In essence the car becomes more "aggressive" till it can clear the intersection.  No mention of a robotic arm option that could signal "disappointment" in others driving abilities.

The Google Self-Driving Car Project has advanced well beyond the prototype out lined above and clearly well well into Level 4 of the continuum.  So have no fear!  Someday, in the not too distant future, all cars will come with "Autonomous Mode" or as I like to call it "Take me drunk I am home" mode.

Thursday 21 January 2016

Restart After Clean up and New Rubber


The engine bay was finally all back together.  The parts for the work were not all that expensive however the amount of labour involved was quite extensive.  If we had taken this to even the most inexpensive mechanic it would have cost more than what was paid for the car just for this clean up.

Here is a total list of what was done during this work:

  1. All fuel line rubber was replaced
  2. Almost all of the vacuum hoses were replace
  3. The spark plugs were replaced
  4. New fuel filter
  5. Thermo valve replaced
  6. New gaskets for each intake manifold
  7. New rubber couplers between plenum and intake manifolds
  8. New hose clamps for rubber couplers
  9. Rubber coupler and hose clamps between throttle body and plenum replaced
  10. Small coolant return hose replaced
  11. Oil separator gasket replaced
  12. Oil change and new oil filter
  13. Battery changed out
  14. Battery disconnect installed
  15. Battery charger/maintainer hard wired to car with quick disconnect
  16. Sunroof was cleaned, serviced and lubricated
  17. New air tubes were installed
  18. Plenum and intake manifolds were extensively cleaned
  19. Air guide housing mounts were replaced
  20. injector outer and inner bushings replaced
  21. Chin protector plates installed
  22. Strut cross brace had paint removed and was cleaned up

After all of that work the engine bay looks absolutely beautiful now.  The contrast was quite striking as can be seen in the side-by-side comparison below.  There are still a few things such as the rad hoses and all the belts that still need to be replaced but that will be done with the timing belt in an up coming working session.   Now that all this work had been done and everything was now re-assembled it was time to try to restart the car.

                                    BEFORE                                                                 AFTER

First thing we needed to do was to check that there were no fuel leaks what-so-ever anywhere on the car.  This requires the three senses of sight, touch and smell. You look and see if any leaks can be seen, you touch each joint to see if you can feel any leaks and you also smell.  You smell the area in general and also your fingers after the touch test.  Any of these fail and you need to fix the issue before even thinking of moving on.  Before you both with that, of course, you need to pressurize the fuel system.  Basically the whole system has no fuel in since it was completely drained and taken apart.  The best way to do this is to jumper the fuel pump relay with a wire so the pump runs without the key in the on position. (See picture to the right) This will fill and pressurize the fuel lines and enable you to check to see if you have any fuel leaks.  We cleared the drive way in front of the garage, rolled the car out a safe distance and had two voluntary fire fighters standing by with the appropriate fire extinguishers ready to go as we validated.  We actually had a connection that failed the test and need to be adjusted.  It was simple matter of not being properly tightened but had we not done these extensive checks it would have cause a serious issue at some point.

Now that all the joints and hoses passed all checks we were in the position of trying to re-start the car. We removed the jumper and replaced the fuel pump relay.  After a few final checks, like did we have any gas in the tank, we gave it a go hoping it would come back to life.  The video below shows the first attempt at restart.


As you can see the first attempt at restart was completely successful. She started up on the first try and with little effort.  We were even able to drive it over to a local car wash to give her outside a much needed cleaning.

The next thing on our list is to repair the angular joint at the front end of the shifting mechanism.  Stay tuned!

Tuesday 19 January 2016

Clean Up Your Engine Bay Young Man!


As you may have already seen this is what the engine bay of our 1983 Porsche 928 looked like upon purchase.  Complete but in obvious need of some serious clean up and general TLC.  The dirt and carbon deposits are pretty obvious.  This all needs to be cleaned up in a big way.  Being a bit of a barn find it is important to give the entire engine bay a good once over, to ensure that no foreign debris is lodged anywhere that could cause damage to the engine or potentially cause a fire.

We pulled the air filter out of the air box and found that a furry creature of some kind, most likely of the chipmunk variety, had been making a home in the air box.  It was also clear that Chippy had a thing for acorns.  I guess in the mind of a chipmunk the trip through the air tubes up each side of the engine to the air box made a perfect place to hide/store nuts.  Basically a den with two exits. Fortunately there was no real damage done and also no bodies to remove.  After a good vacuum of the air box it was now 100% nut free and safe to be within 100m of an elementary school. The first move in the clean up job was to remove the air tubes running on either side of the engine bay and the air box they connect to which is at the very back.   Once off you can get a good look at the inside of the mass air flow sensor unit (picture below on the left) and the back side of the air guide housing itself (picture below on the right).   You can see there is a lot of dirt and oil inside. 

The oil was coming from the oil separator.  This is the black can with the yellow knob you can see in the engine bay picture above. Interesting thing is, the black can is actually silver!  See dirty picture to left and clean to the right.  The black is years of oil leaking down the side of the can.  This is a symptom of a missing gasket.  These two pictures give you a decent contrast of the before and after.  Without that gasket oil leaks down the cup and ends up all over the rubber coupler that holds the throttle body to the air plenum leading to oil in your air.  Not really ideal.  To really get to everything the "spider" needs to come off the top of the engine.  This is pretty straight forward as long as the <CENSORED> bolts are not seized.  In my case only one single bolt was seized and it took three times as much time to free as all the others combined!  Heat, penetrating oil, TNT nothing worked. OK maybe not TNT. In the end the bolt was not seized to the engine head, thank God, it was seized to the leg of the intake manifold and after much inch-by-inch work it came free still stuck in the leg.  The picture below shows the top of the engine without the spider except the offending leg.  See it sticking out there.  Just laughing at me.  Telling its friends what a loser I am. Yes I heard you!  Who's laughing how eh?  But I am not bitter.


Once you get everything off you can easily do a good clean up of the throttle body. It is always a good idea to replace the rubber Plenum-to-throttle-body coupler as well as its two hose clamps. While you have the air guide housing and throttle body exposed check the little bonded rubber buffer mounts.  They will most likely have separated  giving the air guide housing the ability to move about. Not really what you want.  The picture to the right shows a new mount at the top and half of a separated one on the bottom.  Once these separate they can be an absolute <CENSORED> to get out.   The two pictures below show one of the air intake legs and the plenum on the bench. The tape measure gives you some perspective on the size of the two pieces.  These pieces need to be scrubbed down to remove all the dirty and carbon deposits.

This was a very messy, manual and tedious process.  A Varsol tank would be a plus here but if, like us, you do not have one in your garage, you can get by with a smaller rubber maid bin, a collection of wire brushes (not too course) and medium steel wool.  Keep the brush and the steel wool wet with the solvent of choice to ensure you are not too rough on the surface of the parts.  You will find this takes time and patience but the end result is worth it.  

I considered powder coating the parts after seeing some of the pictures in the forums.  It looks very nice and super clean.  You can even choose the colour you wish to use to match any colour scheme you have going on under the hood. Once we got them cleaned up it was decided to stick to original as much as possible To do the  actually cleaning chemicals were required. I used copious amounts of the liquids depicted in the picture to the left.  Really you should feel free to substitute your favourite or preferred. Rest assured you will require far more of the one in the bottle than the others combined.  Far more!

After all the cleaning is done the reassembly begins.  This was far easier than the tear down.  New gaskets will be required for the air intake legs. The old gaskets must be completely cleaned away from the top of the engine and the bottom of the air intake leg.  After the spider was completely back in place I re-installed the injectors on the fuel rail (see previous post).  Before I did this I replaced all of the rubber inner and outer bushings on each. (See picture to right) This helps ensure a clean seal and tight fit.  We do not want any air leaks.  After that the reconstructed rubber fuel lines were also put back into place and new air tubes were installed.  The final result is shown in the picture below.  Quite a contrast to the original state of the engine bay as seen in the picture at the beginning of this post.

All that is left now is to reconnect the fuel lines at the back of car and to see if it will start again after all this work.  Cross you fingers!

As always we encourage people to donate to our Fight Cancer Campaign. After that if you have any spare change and you enjoyed this post we encourage you to donate to help us keep the content coming.  Links for both donation can be found on the menu on the right.  We greatly appreciate all your support.

Sunday 17 January 2016

Only You Can Prevent Engine Fires!

The 1983 Porsche 928s is a beautiful and cool car no question but after 32 years she will be showing her age and that is OK.  A few things that extend beyond just routine maintenance will need to be done. After combing through 928 community forms and various other group support systems it became obvious that one action was required first and foremost.  The rubber in the engine bay would need to be replaced. I spent the better part of  two days of looking for a condom in the engine bay to no avail before I re-read the posts and I learned the errors of my ways!  Fuel hoses, rubber fuel hoses that is what they were referring to. I always thought of the car as a female anyway finding a condom in the engine bay would have just been, well, wrong.  

It is just a fact of science that all compounds breakdown and ultimately fail over time. Compounds such as rubber.  When that rubber is a component in the fuel lines it becomes a larger concern. 30 year of passing fuel under pressure through the rubber components will take a toll.  Especially in North America where our petrol is contaminated with ethanol. This ultimately makes a bad situation worse. If this is not concern enough the majority of these rubber hoses live in the engine bay.  If any of these hoses rupture it mean an engine fire.  In technical terms this is what mechanics refer to as "bad!". To avoid this all of that rubber needs to be replaced with proper rated hose and the appropriate type of clamps.  The 1983 Porsche 928 fuel system runs a pressure of approximately 2.5 bar or 55 psi. It is critical to use an appropriate hose with a specification can support this application.  The same goes for the clamps.  It would be a damn shame if you spend all this time replacing the rubber only to cause exactly what you are trying to avoid by using the wrong hose or clamps.  So how do you sort this?!?

When you find yourself obsessing over a Porsche 928, the first thing you need to realise is that no matter what you are seeing or needing, someone else has already been there and done that. So when you require information you will find that there are some great 928 resources on the web, teaming with fellow believers just dying to initiate people into the our "not-so-secret-society" and teach them the secret hand shake. As tongue-in-cheek as that was meant to sound, it is not actually far from the truth and as a recent convert to the Church of 928 I can whole heartedly testify that you are not alone!  Ask and ye shall receive!  To do that there are two forums that are a must to be a member of. Rennlist and Pelican Parts.  These forums both have specific areas for 928 enthusiasts where knowledge is past, documented and problems solved.

There are also two friends you need Carl Fausett from 928 Motorsports and Roger Tyson from 928sRus.  These two men are the Grand Poobahs of the 928 community and a touchstone for parts, technical information and advice.  Carl's site focuses on performance and racing aspects of the 928 platform as well as speciality items. If you plan to take your Porsche 928 on a track he is the man to talk to.  He sells a variety of parts that make your 928 even better and more fun on a track. Even if you are not taking your 928 on a track I highly recommend the chin plates to protect you from damage due to bottoming out.  Roger is a source for basically everything you need to keep your 928 running and healthy.  If you tell Roger what you are doing and what you think you need, he will hook you up and make sure you are not missing anything. The customer service I have experienced with both gentlemen has be absolutely stellar and I could not have gotten as far as I have without their help.

In the specific case of the rubber replacement I ended up getting the High Pressure Fuel Line and the Fuel Line Clamp Kit from 928 Motorsports.  This way I knew I had the right line and the right clamps for the application.  Also knowing Carl has used this combination in several cases in the past made me comfortable that this was a tried and true method.  Carl even has a PDF document outlining how to work with the clamps and line. The images below indicate with red arrows the hoses that need to be replaced for the 1983 928s.


The image to the left shows a selection of the key hoses that need to be address as a bare minimum. The lower two hoses connect the fuel distribution system in the engine bay to hard fuel lines that come form the rear of the vehicle.  In the middle you see the injectors (total of 8) still connected by the little 2 inch rubber hose to the fuel rail. The hose at the top is from the rear of the car, used to interconnect the hard fuel lines to the fuel filter.  This was the only hose that we actually could find an OEM replacement for.  We kept the original for the sake of the fittings.
The image to the right gives a clearer look at the hoses from the injector to the fuel rail.  The OEM clamps on these things were quite a pain to cut off. It was all about the sharp tin snips and a whole lot of patience and liberal application of single malt.
The image to the right is what things look like once your have changed all the rubber.  I did a little clean up on the fuel rails, that the injectors connect to as well, before replacing them in the engine bay.  The re-installation is pretty straight forward for the injector rails but the interconnection hoses between the fuel distribution system in the engine bay and the hard fuel lines to the rear of the vehicle were annoying to get to and frustrating to disconnect and reconnect on the hard fuel line side.  A combination of tight access and the tight lock of the nuts managed to coax more than a few curse words and an equal number of beer breaks before we were able to get them release and then back into place.  Thank god I have a strong liver and sound proof  (mostly) Garage. Some clean up was done prior to replacing the injectors but I will save that for another post.

With these hoses now replaced the fear of engine fires has been mitigated as much as possible. With any vehicle it is always a risk but now the probability has been drop substantially and the possibility of a hose rupturing is as close to zero as possible.  We can now drive the 928 with no fear, although we still keep a fire extinguisher in the car at all times.

As always we encourage people to donate to our Fight Cancer Campaign. After that if you have any spare change and you enjoyed this post we encourage you to donate to help us keep the content coming.  Links for both donation can be found on the menu on the right.  We greatly appreciate all your support.

Tuesday 12 January 2016

Inception of a Dream...or Obsession

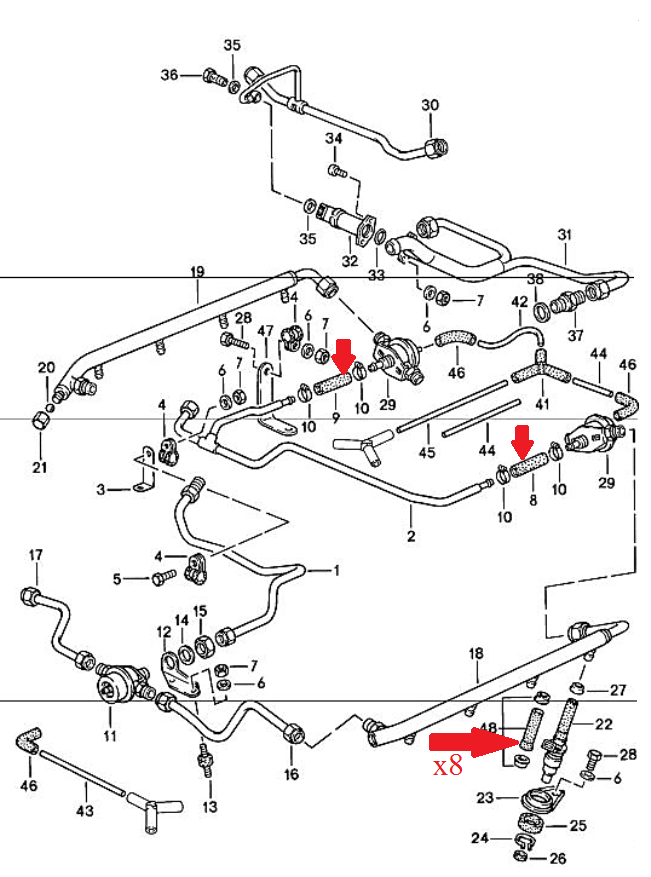
It is my experience that the first step to establishing a well founded obsession is to start with idea that would normally attract the question "are you drunk?".  I also find that it does help if you are.  As it would happen in 2006 after sufficient "preparations" I found myself in a discussion about an article by Jim Kenzie about a road race called Targa Newfoundland.  So the planning sessions began.  If I am honest, initially it was more of a topic that popped up every time alcohol was too liberally applied. That is the insidious nature of an obsession.  It starts small.  Almost an after thought.  It slowly worms its way deep in to your brain to takes up permanent residence with floral pattern curtains, a hideous Ottoman and the Looney Tunes song on perpetual repeat. Of course at this point it is far too late and you merely sing along with your feet up on the Ottoman barely noticing the curtains.  You can always tell when this state has been reached because the drunken phrase "We should do that one day" gets replaced with a "We are doing it!" statement with a dangerously low blood alcohol level. So with that the real impacts of the obsession began. 

The first two questions were obvious.  What car and what division?  In the end it was agreed that the Fast Tour Division was the best fit.  This was mostly due to the minimal preparation required for the vehicle.  It worked with our meagre budget and yet still satiated the obsession.  The next challenge was to find a car.  Quickly a list of "must have" requirements was created. The list was balanced with our desires for the driving experience against our deplorable lack of funds.  The idea was to get a car that if we banged it up we would not be heart broken.  As it turns that rule was complete violated.  The key attributes on the list were as follows:
  1. Manual transmission
  2. Rear wheel drive
  3. Decent handling
  4. Decent power to weight ratio
The decent handling ruled out almost all North American cars immediately.  Basically nothing we could afford had the handling we were looking for and the older the car the worst the handling gets.  The rear wheel drive eliminated all of the hot hatches and most of the Japanese imports but we did make one exception to this rule.  The Volkswagen Scirocco from the 80s. This car was once the prized possession of William and how could anyone say "no" to the passionate way he would drone on about it.  Hey, we were probably going to wreck it anyway.  After much toil the decision came down to five options.  The list below is sorted in no particular order by William.
  1. Volkswagen Scirocco 
  2. Porsche 944 or 924
  3. Mazda RX7 late 80s or early 90s for the horse power
  4. Nissan 280ZX or 300ZX
  5. Porsche 928
We looked at several cars in each category and quickly realized that what fell in our price range either required way too much work or was a low power non-turbo version failing our power requirements. The latter was the case with almost all the Porsche 924/944 cars we looked at.  The most surprising thing was the Volkswagen Scirocco.  The ones that were in our price range required a complete ground up rebuild. If we wanted to we could pay double our budget for a well kept/restored car. The durability and lack of torque from the Mazda and the Nissan cars made us leery given the environment we would be taking the vehicle through. Another surprise was that the early 80s Porsche 928 were falling in our range but most of them were automatic transmissions.  We decide to have a serious look at them.

Though we had not truly settled on which car make/model yet the more we looked at the specifications and available information about the 928s the more interested we got.  How could you not be attracted to a 234 HP 4.7L V8 with  L-Jetronic fuel injection system, a rear transaxle for near perfect 50-50 weight distribution and handling better than everything else on the list.  The size of the  928 community of enthusiasts openly sharing information, ideas and techniques was staggering.  For the 928 line up these people were obsessive, bordering on cult status.  They were, however, the nicest bunch of zealots you would ever want to meet.  These people seem to document and post just about everything they do in excruciating detail.  I found a 188 page PDF detailing how to change the timing belt and water pump! 188 pages of glorious pictures and detailed descriptions.  After several email conversations with some very knowledge and extremely helpful people the decision was really made. The 928 was the car we wanted.  The real challenge now was to find a manual transmission in our price range that did not need a massive overhaul.

There were 24 listings at the time in Canada selling a Porsche 928 however only 6 were manual and of the 6 only 3 were in our budget and in driving distance.  The first one we looked at was a 1982 in the colour red.  The body was in pretty good shape but the engine bay was a mess. The big concern was what damage has been done and the noticeable whine coming from the rear end.  In the end we felt it was not worth the risk and we passed.  The second was a silver 83 in Georgetown Ontario. It had been listed at a price that was outside our budget but just barely.  We figured we could try to negotiate the price lower and see what happens.  We took a look at it and right away saw that the body was in fantastic shape.  The engine bay was complete and the engine was running strong.  There were issues that would need to be dealt with mind you.  The biggest issue was the clutch needed to be done but other smaller things like electric motor on the driver's side seat was intermittent, license plate light needed a bulb, clutch safety switch was not working, parking break light switch was not working. Less technical but still annoying was the smell of the interior of the car.  It obviously was stored in a barn extensively and the smell reflected it.   We also knew from the 928 community that there was rubber in the fuel lines that needed to be replaced and that it was very time consuming to complete.  After giving the car the once over we decided to talk it over and think about it a bit.  We had another car to consider as well.  After about a two weeks of trying to line up a chance to look at the third car unsuccessfully we decided to have another look at the silver 83.  By now the car had been listed for some time and there were very few bites apparently.  Based on what we know about the work that was needed and the price he was asking I think it was understandable.  The person buying it had to be committed to the project.  We managed to negotiate the current owner to a number that was inside our budget and pulled the trigger.  The current owner was great about everything.  He helped us get the car certified and even gave us the complete set of workshop manuals.  It would quickly become apparent that we now had a new obsession to keep our original obsession company.  Here are a few pictures of the car in its state when we purchased it.


As always we encourage people to donate to our Fight Cancer Campaign. After that if you have any spare change and you enjoyed this post we encourage you to donate to help us keep the content coming.  Links for both donation can be found on the menu on the right.  We greatly appreciate all your support.